Run a worker
Requirements
To run a single worker you'll need:
- 4 vCPU
- 16GB RAM
- 1TB SSD
- stable 24/7 Internet connection, at least 1Gbit
- a public IP and two ports open for incoming traffic:
- one UDP port for p2p communication (default 12345)
- one TCP port for Prometheus metrics (default 9090)
- Docker + Docker Compose
100_000SQDtokens (in your wallet or in a special vesting contract)- some Arbitrum ETH (for gas)
The SQD tokens should be available to your Primary Wallet - either directly or through a vesting contract. With enough funds you can use one Primary Wallet to register multiple workers.
Your Primary Wallet should have browser support. We recommend Metamask.
You can run a worker from a Docker image or from its source code. Note that you'll need Docker either way, as our configuration script uses it.
Configuring your setup
-
Pick a location for worker data. It should be able to accommodate at least 1Tb. Do not create the data folder manually, just find a place for it.
-
Pick a location for your SQD Network key file. The location must be outside of the data directory.
⚠️ Warning: Ensure that that the key will not be deleted accidentally and cannot be accessed by unauthorized parties. Or else.
-
Create a new directory for installation files and save the
setup_worker.shscript in it:curl -fO https://cdn.subsquid.io/worker/setup_worker.shMake the script executable:
chmod +x ./setup_worker.sh -
Run the setup script. Supply the data directory path and the key path to it:
./setup_worker.sh <DATA_DIR_PATH> <KEY_PATH>The script will prompt you for an UDP port to use for P2P communication and give you an option to set your public IP address in worker config statically. Most users should not set the IP address here since setups with automatic IP discovery are more robust.
Here's what the script does:
- creates a directory at
<DATA_DIR_PATH> - generates a key file at
<KEY_PATH> - generates a
.envfile in the current directory and populates it with reasonable defaults - downloads a
.mainnet.envfile - downloads a
docker-compose.yamlfile for running prebuilt worker images
You can take a look at the files that the script downloads here.
The last line of the script's output should look like this:
Your peer ID is: 12D3KooWPfotj6qQapKeWg4RZysUjEeswLEpiSjgv16LgNTyYFTW. Now you can register it on chain.Please copy your peer ID, as it will be needed for on-chain worker registration.
- creates a directory at
-
(optional) Feel free to edit the generated
.envand.mainnet.envfiles if you'd like, e.g., to set a custom Prometheus port or use your own RPC provider.
Proceed to Worker registration.
Worker registration
Before you run a worker node, you need to register it on-chain using our web application. Here are the steps to do this:
-
Go to https://network.subsquid.io.
-
Connect your Primary Wallet.

-
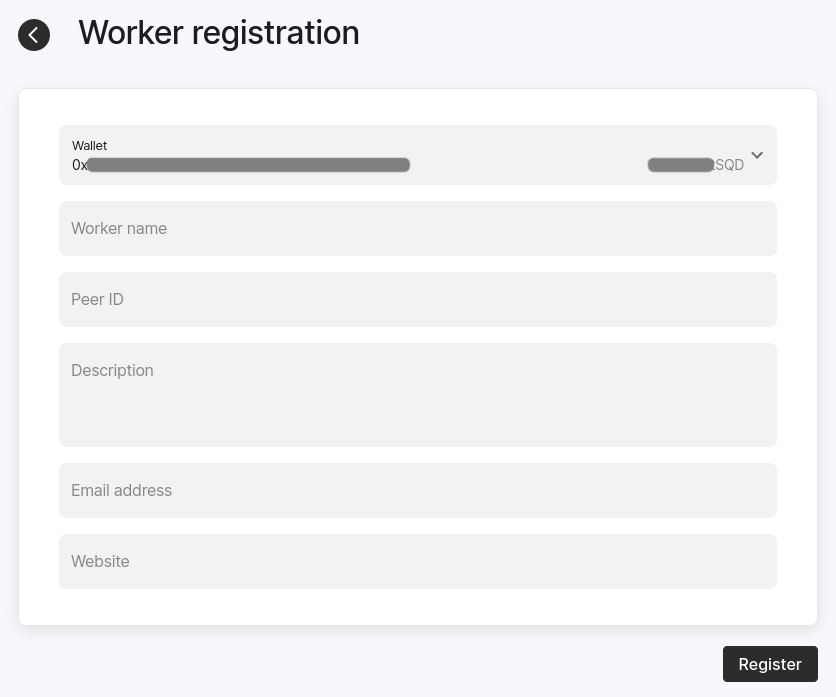
Go to the Workers tab and press the "Add Worker" button. You should see a worker registration form:
-
Fill the form and submit it by signing a transaction:
- In the top drop down menu, choose either "Wallet" (to use
SQDs from your wallet directly) or "Vesting contract" (to useSQDs from a vesting contract). - Use the peer ID you copied at step 4 of Configuring your setup.
- In the top drop down menu, choose either "Wallet" (to use
-
Go to the "Workers" tab and wait until the status of the registered worker changes to "Offline" or "Active". Since workers can only be activated at the beginning of an epoch, you may have to wait for a few minutes.
Proceed to Running a worker.
Running a worker
Make sure you're still in the folder where you executed setup_worker.sh during configuration before proceeding.
Using a pre-built Docker image
Run
docker compose up -d
then check the logs of the worker container with docker compose logs. After some time the worker should output some info on the downloaded data chunks.
Building from the source
-
Install prerequisites (Rust, Git, Protobuf, etc), e.g. with
apt install curl git build-essential pkg-config protobuf-compiler libssl-dev libsqlite3-dev
curl --proto '=https' --tlsv1.2 -sSf https://sh.rustup.rs | sh -
Load the config generated during the setup.
source .mainnet.env
source .env -
Clone the worker repo.
git clone --depth 1 --branch v1.0.0 https://github.com/subsquid/worker-rs.gitThis may take a few minutes.
-
Build the worker.
cd worker-rs
cargo build --release -
Run the worker using the command below. It uses
nohup, but you may also consider daemonizing it withsystemdoropenrcto tolerate server restarts.nohup cargo run --release -- --port $PROMETHEUS_PORT p2p -
After some time the worker should start downloading data and serving queries.
Updating a worker
Sometimes you will need to update your worker. Here's the default procedure:
-
Back up your key file.
-
If you are running a docker image:
- go to your installation files folder
- fetch the updated
docker-compose.yaml:curl -fO https://cdn.subsquid.io/worker/docker-compose.yaml - run
to apply the update.
docker compose up
-
If you're running a binary built from source:
- note the new worker version in the announcement
- go to your installation files folder
- enter the
worker-rssubfolder - fetch the new commits:
git fetch --unshallow - check out the new worker version:
git checkout <new_version_tag> - rebuild the worker:
cargo build --release - restart the worker process
No need to erase the data folder or re-register your worker.
Some releases may require that you deviate from this procedure, so please read release notes carefully.
On jailing
Jailing is a scheduler-side mechanism that ensures that every data chunk is available for querying. The scheduler tries to predict which workers are "unreliable" and makes the best effort to guarantee that each chunk is available on at least several "reliable" worker nodes. However, even if a worker is marked as unreliable, it continues serving queries from the chunks it had downloaded and getting the rewards. And it's only temporary — the worker will get unjailed automatically within ~3 hours. If the reason for jailing is gone, it won't be jailed next time.
If the worker constantly gets jailed, it may affect its rewards, so it shouldn't be ignored. There are multiple reasons why the worker can be marked as unreliable (see worker's logs to find out which one applies):
- Worker didn't download any of the assigned chunks in last 900 seconds (
stalein our internal terminology) — this one is the most popular. The cause of the problem should be found in the worker's logs. The most probable one is the download timeouts. - Worker didn't send pings for over 600 seconds (
inactive) — it may occur for example when a worker got back after a long downtime. If the scheduler doesn't receive pings from the worker, it considers it offline and doesn't assign any chunks to it. - Worker could not be reached on a public address (
unreachable). This was our attempt to determine which nodes are not reachable through the p2p network, but the correct implementation turned out harder than it seemed, so it is disabled right now.
Troubleshooting
Where do I find my peer ID ?
It is printed when you run setup_worker.sh (see Configuring your setup).
It is also in the first line of the worker log output. For the docker setup, inspect the worker container logs with docker compose logs.
If you installed your worker from source, check the network.log file.
In both cases, the log line you are looking for should look like this
2024-05-28T07:43:55.591440Z INFO subsquid_worker::transport::p2p: Local peer ID: <PEER_ID>
I see Failed to download chunk ... operation timed out in the worker logs
Depending on your connection quality, you might want to tune the S3_TIMEOUT and CONCURRENT_DOWNLOADS environment variables in the .env file. If you encounter this error frequently, try to set S3_TIMEOUT to 180. If it still doesn't help, set CONCURRENT_DOWNLOADS to 1 and S3_READ_TIMEOUT to 30.
Worker crashes with the message Trying to collect logs up to ...
Something is wrong with your local data. Stop the worker, remove the entire data directory, and start it again.
I see an Insufficient peers... error in the worker logs
Just ignore it
Can I move my worker to another server?
Yes, copy the key file (at <KEY_PATH>) to the new working directory before starting. You don't need to re-register your worker. Don't forget to update the data directory on the new server.
I have just started my worker but see no logs
This is normal. Wait for a few minutes and the logs should show some data being downloaded.
Should I build it from source or run with Docker?
Docker makes for an easier setup. Building from sources is suitable only for experienced Linux/Unix users.
How do I check that my worker is updated to the latest version?
Check the pings endpoint and locate the version by your peer ID.
Which Linux distro is recommended?
We recommend Ubuntu 22.04 LTS.
I see error from daemon in stream: Error grabbing logs
This is a Docker issue, not a problem with the worker. Look at this GitHub issue and this Stackoverflow thread for more context.
How do I check if my worker is up-to-date and running?
Copy your peer ID and look for an entry on this page. If the last ping timestamp is 1 minute ago, and the listed version is the most recent one, you should be good.
I'm getting Clone succeeded, but checkout failed when cloning the worker repo
Enter the repo folder and check out v1.0.0 manually:
cd worker-rs
git checkout v1.0.0
What are the consequences of losing my key file / getting it stolen?
If you lose your key file you won't be able to run your worker until you get a new one and register it.
If your key file gets stolen the perpetrator will be able to cause connectivity issues for your worker.
If any of that happens, unregister your worker (on the "Workers" tab of network.subsquid.io), generate a new key file and register your new peer ID.